Git Branch Explained – How to Use and Manage Git Branches
Git branch provides a helpful way to create a subsection of your main work.
In other words, Git branch allows you to try new experiments on a secondary line of development without affecting your main work.
Below are the main ways developers use and manage Git branches.
Cloning a Git Repository and All Its Branches
Section titled “Cloning a Git Repository and All Its Branches”Git Cloning is mainly about getting (downloading) a copy of a .git repository.
For instance, you may need a copy of a project you intend to modify. In such a case, getting a clone of the project’s .git directory puts in your possession all the file versions the project’s contributors have committed to the .git repository.
To clone a repository, run the following:
git clone <theGitRepoURL> <state the place to put the cloned git folder>By so doing, Git will download a copy of the specified .git repository into the place you’ve identified.
Cloning a Single Remote Branch While Tracking All the Other Ones
Section titled “Cloning a Single Remote Branch While Tracking All the Other Ones”git clone -b <remote-branch-name> <remote-repo-url>The command above tells Git to download only the specified remote branch while tracking the others.
Cloning a Single Remote Branch without Tracking All the Other Ones
Section titled “Cloning a Single Remote Branch without Tracking All the Other Ones”git clone -b <remote-branch-name> --single-branch <remote-repo-url>The command above tells Git to download only the specified remote branch without tracking the others.
Checking the Branches in a Project’s Local Git Repository
Section titled “Checking the Branches in a Project’s Local Git Repository”git branchThe command above will display all the branches in your local Git repository.
Alternatively, you can also use:
git branch --listChecking the Branches in a Project’s Remote Git Repository without Displaying Their Reference Details
Section titled “Checking the Branches in a Project’s Remote Git Repository without Displaying Their Reference Details”git branch -rThe command above will display all the branches in your remote Git repository. But it will omit the branches’ reference details.
Git prefixes a remote branch with its repo’s URL name to distinguish it from your local branch. For instance, origin/main indicates that the main branch lives in a remote repository whose URL’s name is origin.
Checking the Branches in a Project’s Remote Git Repository While Also Displaying Their Reference Details
Section titled “Checking the Branches in a Project’s Remote Git Repository While Also Displaying Their Reference Details”git ls-remoteThe command above will display all the branches in your remote Git repository and their reference details (including commit hashes).
Checking the Branches in a Project’s Remote Git Repository While Also Displaying Their Hashes
Section titled “Checking the Branches in a Project’s Remote Git Repository While Also Displaying Their Hashes”git ls-remote --headsThe command above will display all the branches in your remote Git repository and their commit hashes.
Checking All the Branches in a Project’s Local and Remote Git Repository
Section titled “Checking All the Branches in a Project’s Local and Remote Git Repository”git branch -aThe command above will display all the branches in your project’s local and remote repos.
Creating a New Git Branch
Section titled “Creating a New Git Branch”git branch new-branch-nameThe code above will create a new branch called new-branch-name.
By default, Git creates a new branch from the HEAD point. However, you can specify the exact branch from which you want to create your new branch.
For instance, the command below tells Git to create new-branch-name from existing-branch-name.
git branch new-branch-name existing-branch-nameKeep in mind that you can also create a new branch from a specific commit like so:
git branch new-branch-name 7b804hrwThe code above instructs Git to create new-branch-name from the commit with the hash number 7b804hrw.
Renaming the HEAD Branch
Section titled “Renaming the HEAD Branch”git branch -m branch-new-nameThe code above will rename the HEAD (active) branch to branch-new-name.
Renaming a Non-HEAD Branch
Section titled “Renaming a Non-HEAD Branch”git branch -m branch-old-name branch-new-nameThe code above will rename branch-old-name to branch-new-name.
Switching between Git Branches
Section titled “Switching between Git Branches”You can use the checkout or switch command to switch between your project’s branches.
Git checkout vs. switch: What’s the difference?
Section titled “Git checkout vs. switch: What’s the difference?”git checkout is a versatile command for doing many things, such as switching between branches, restoring files, and switching between commits.
However, we use git switch only to switch your project’s HEAD from one branch to another.
Below are popular ways of using git checkout and git switch to switch between branches.
Switching from one branch to another
Section titled “Switching from one branch to another”git checkout branch-nameThe command above instructs Git to switch to branch-name.
Alternatively, you can also switch branches like so:
git switch branch-nameAfter the switch, branch-name will become the HEAD (active) branch. In other words, the HEAD pointer will move to branch-name.
Suppose you switched from branch A to branch B. In that case, you can use the previous branch shorthand (-) to switch back to branch A:
git switch -Creating and switching immediately to a new branch
Section titled “Creating and switching immediately to a new branch”git checkout -b new-branch-nameThe switch command equivalence of the code above is:
git switch -c new-branch-nameNote that the -b and -c flags tell Git to create a branch before switching to it. In other words, git checkout -b new-branch-name is a shorthand for:
git branch new-branch-namegit checkout new-branch-nameWhile git switch -c new-branch-name is a shorthand for:
git branch new-branch-namegit switch new-branch-nameBy default, Git creates a new branch from the HEAD. However, you can specify the exact branch from which you want to create your new branch.
For instance, the command below tells Git to create new-branch-name from existing-branch-name.
git checkout -b new-branch-name existing-branch-nameHere is the switch alternative:
git switch -c new-branch-name existing-branch-nameKeep in mind that you can also create a new branch from a specific commit like so:
git checkout -b new-branch-name 7b804hrwThe code above instructs Git to create new-branch-name from the commit with the hash number 7b804hrw.
Here’s the switch equivalence:
git switch -c new-branch-name 7b804hrwSo, now that you know how to switch between Git branches, we can discuss switching between commits.
Switching between Git Commits
Section titled “Switching between Git Commits”You can use the git checkout command to switch from one commit history to another.
By default, Git will only allow you to switch to another commit if you have committed all your changes.
Here’s an example:
git checkout z8d2f115010634ea4ae0a2670p7aec61b394c306The code above tells Git to switch to the commit having a hash string of z8d2f115010634ea4ae0a2670p7aec61b394c306.
Suppose you only wish to restore an old version of a specific commit’s file. In such a case, indicate the file after the commit’s hash like so:
git checkout z8d2f11 App.jsThe code above tells Git to restore z8d2f11’s App.js file only—not all z8d2f11’s commits.
Exiting the Detached State of a Project’s HEAD Pointer
Section titled “Exiting the Detached State of a Project’s HEAD Pointer”You can exit the detached state by switching to any of your project’s branches.
Here’s an example:
git checkout mainThe code above tells Git to switch to the main branch.
Comparing the Differences between Two Git Branches
Section titled “Comparing the Differences between Two Git Branches”You can compare the difference between two branches like so:
git diff first-branch-name..second-branch-nameThe code above tells Git to show the differences between first-branch-name and second-branch-name.
Therefore, Git will display a result like the following image:
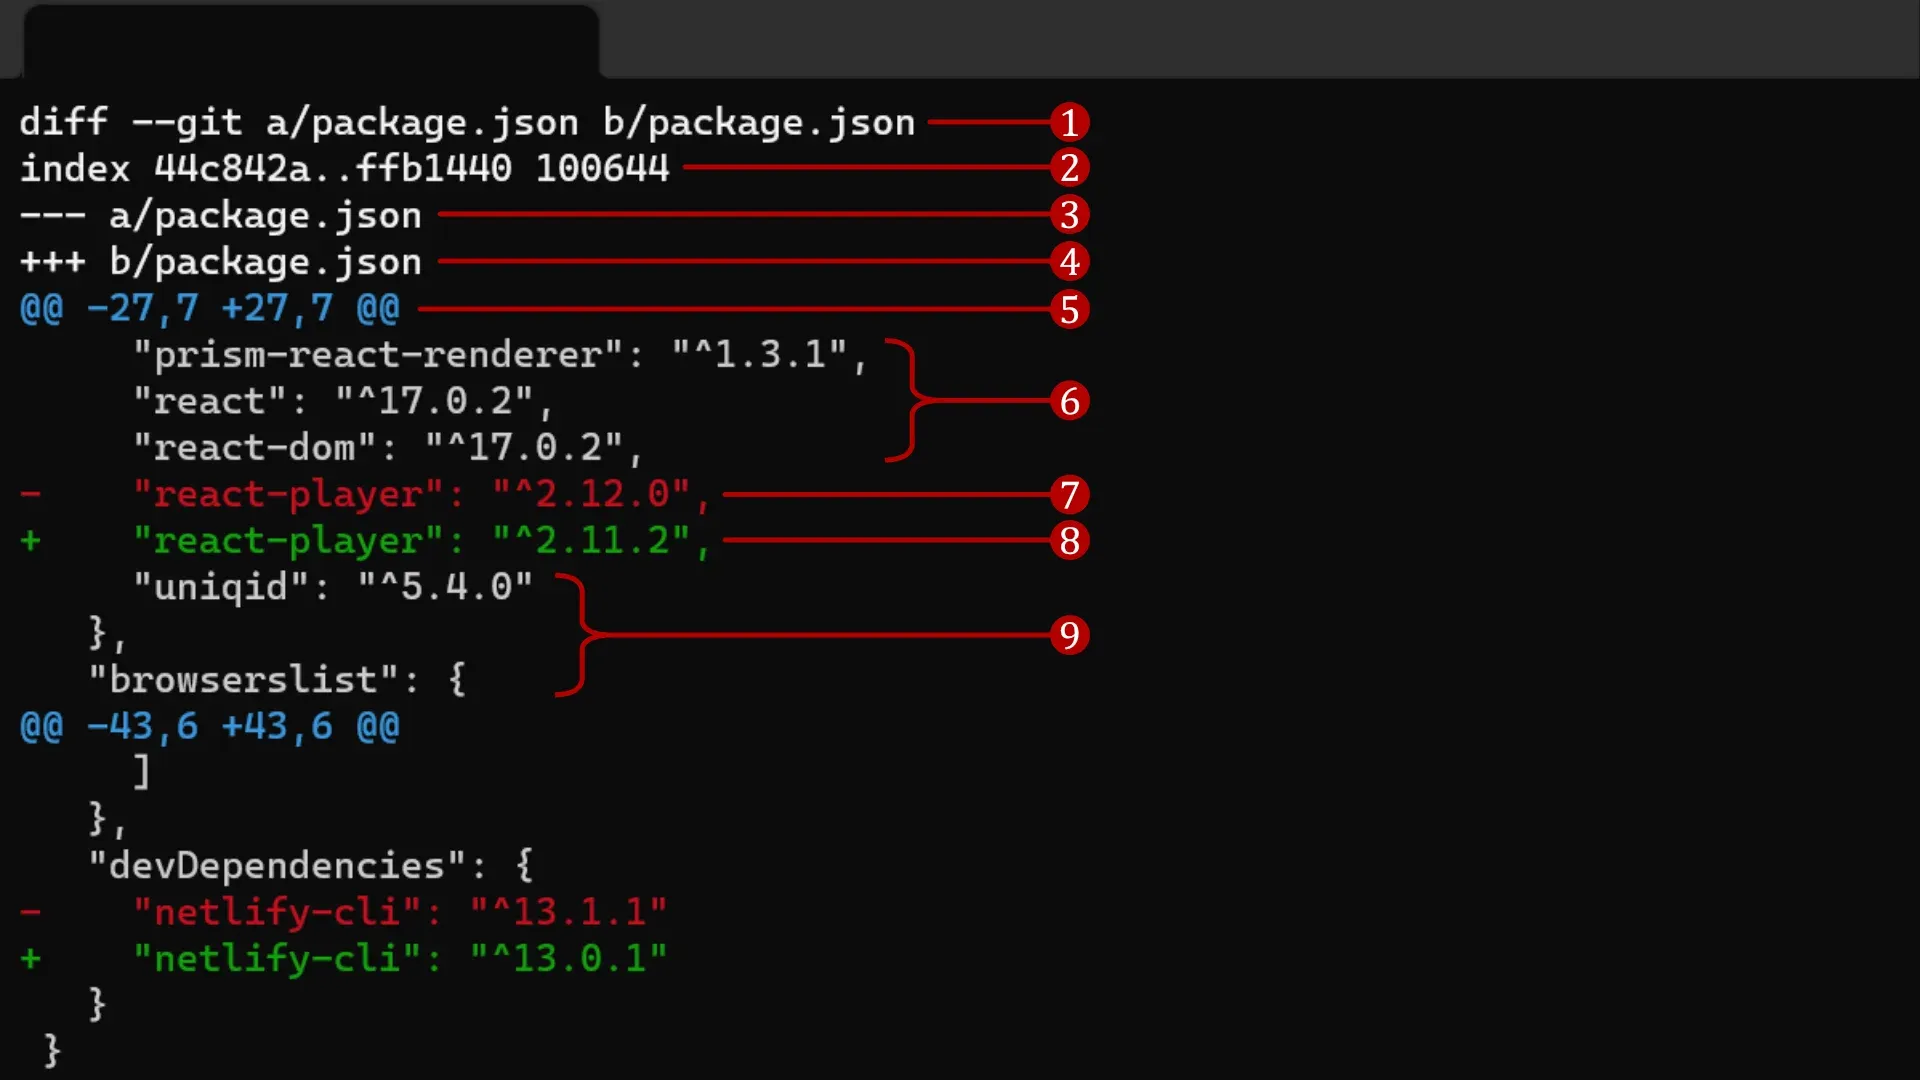
The git diff command returns the difference between two package.json files.
Let’s discuss what the git diff’s output means.
1. Files in which Git found some differences
Section titled “1. Files in which Git found some differences”diff --git a/package.json b/package.jsonGit used the output above to indicate the files in which it found some differences.
In other words, Git found some differences in the first-branch-name and the second-branch-name’s package.json files.
Note the following:
a/package.jsonrefers to thepackage.jsonof the first branch you specified in yourgit diff first-branch-name..second-branch-namecommand. So, in this case, it referencesfirst-branch-name.b/package.jsonrefers to thepackage.jsonof the second branch you specified in yourgit diff first-branch-name..second-branch-namecommand. So, in this case, it referencessecond-branch-name.
2. Information about the files in which Git found some differences
Section titled “2. Information about the files in which Git found some differences”index 44c842a..ffb1440 100644Here is what the above index information means:
44c842a..ffb1440indicates the SHA-1 checksum of the two files where Git found some differences.100644refers to the mode of the files represented by the SHA-1 checksum44c842aandffb1440.
3. File a’s marker
Section titled “3. File a’s marker”--- a/package.jsonThe line above indicates the maker Git used to reference the differences in the first-branch-name’s package.json file.
In other words, Git used --- (minus signs) to mark the differences in the first-branch-name’s package.json file.
4. File b’s marker
Section titled “4. File b’s marker”+++ b/package.jsonThe line above indicates the maker Git used to reference the differences in the second-branch-name’s package.json file.
In other words, Git used +++ (plus signs) to mark the differences in the second-branch-name’s package.json file.
5. The chuck header
Section titled “5. The chuck header”@@ -27,7 +27,7 @@Here’s what the chuck header above means:
-27in-27,7indicates that Git started the chuck’s extraction from the 27th line of thefirst-branch-name’spackage.jsonfile.7in-27,7implies that Git extracted a chuck of 7 lines. In other words, Git extracted lines 27, 28, 29, 30, 31, 32, and 33 from file a.+27in+27,7signifies that Git started the chuck’s extraction from the 27th line of thesecond-branch-name’spackage.jsonfile.7in+27,7implies that Git extracted a chuck of 7 lines. In other words, Git extracted lines 27, 28, 29, 30, 31, 32, and 33 from file b.- The
@@symbols mark the beginning and end of the chuck header.
6. The context above line 27
Section titled “6. The context above line 27”"prism-react-renderer": "^1.3.1","react": "^17.0.2","react-dom": "^17.0.2",The output above is the three lines of context above the difference Git found.
In other words, Git displayed some context above the line where it found a difference.
7. File a’s difference
Section titled “7. File a’s difference”- "react-player": "^2.12.0",The output above shows the difference Git found in the first-branch-name’s package.json file.
8. File b’s difference
Section titled “8. File b’s difference”+ "react-player": "^2.11.2",The output above shows the difference Git found in the second-branch-name’s package.json file.
9. The context below line 27
Section titled “9. The context below line 27” "uniqid": "^5.4.0",},"browserslist": {The output above is the three lines of context below the difference Git found.
In other words, Git displayed some context below the line where it found a difference.
Merging Git Branches
Section titled “Merging Git Branches”Git merging allows you to merge another branch’s changes into the HEAD (current) branch.
Here’s the merge syntax:
git merge name-of-branch-containing-your-changesThe code above instructs Git to merge name-of-branch-containing-your-changes with the HEAD (current) branch.
Git may prompt you to enter a commit message on running the merge command. You can either provide a new message or accept Git’s default.
Afterward, close the editor’s window to save the commit message.
An alternate way to merge changes from one branch into the HEAD branch is to use the rebase command like so:
git rebase name-of-branch-containing-your-changesDeleting a Git Branch
Section titled “Deleting a Git Branch”git branch -d branch-to-deleteThe code above will delete the branch called branch-to-delete.
Note that you cannot delete the branch that is currently the HEAD branch.
Likewise, Git does not permit deleting a branch containing unmerged changes.